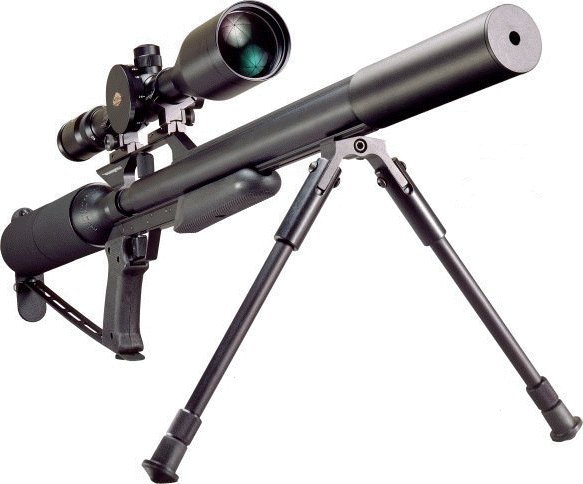
An Introduction to the Gunpower Stealth
© Bob Craske

Operation
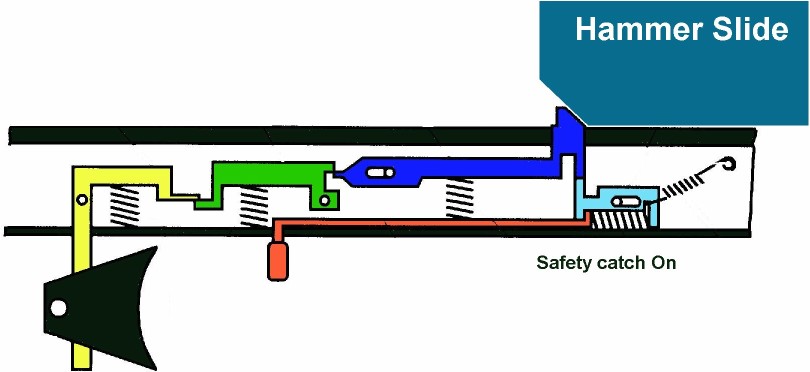
The
Rifle is cocked by
means of the cocking handle [A] which is screwed directly into the plastic Breech Cover. The Breech
Cover, which incorporates 2 ‘O’ ring seals, is tubular in design and slides
on a machined reduction in the barrel's circumference. As it is pushed forward
it exposes the breech for pellet insertion and simultaneously pushes the
Hammer Slide [D] against its spring [F] which is thus compressed against the Barrel
Mounting Ring [G].
As the
chamfered rear face of the hammer slide
passes over the Trigger release Sear
[E], the sear pops upward under spring
pressure and the 3 trigger bars are aligned under spring pressure forming an
'equilibrium block' which balance spring forces in a lateral plane preventing
the sear from moving and therefore holding the hammer in the cocked position
under spring tension. At the same time a safety mechanism consisting of a baulk
plate is drawn beneath a projection on the sear plate by a spring,
preventing disengagement until the safety is manually
released. The Cocking lever is
manually drawn fully rearwards by the firer and rotated to lock it in position.
The two
‘O’ rings shown at [C], then form an airtight seal between the breech end of the
barrel and the Air Bottle Release Valve, usually known as the 'Top Hat' [B].
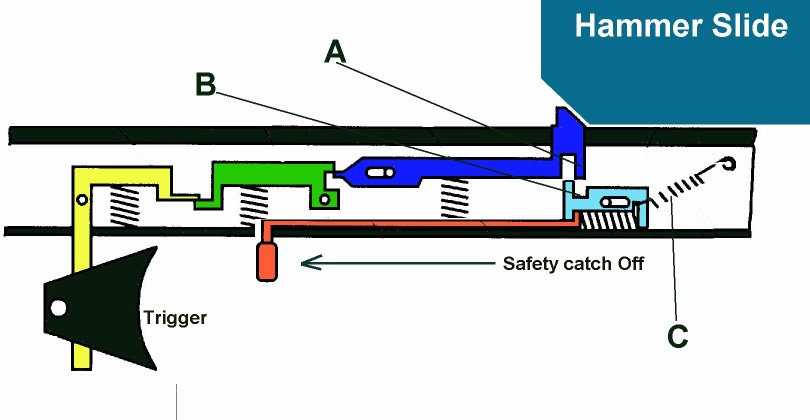
When the gun is fired, operation of the
trigger causes the rear Trigger Bar to rotate about its pivot in a clockwise
direction, tripping its adjoining bar and allowing the sear
to rotate and fall. With nothing to prevent its movement except a small
return spring, the sear is pushed downwards by the chamfered front face of the Hammer
Slide which, propelled
by its much stronger spring, travels rearwards to impact forcibly with the front face of the Breech Slide.
This transfers the Hammer Spring's energy through the slide and directly onto the face of the Air Bottle Release
Valve. The Valve is momentarily forced from its seat against the air pressure in
the bottle and a charge of air passes through the opened valve inside the bottle
and through a
longitudinal hole drilled in the valve body before impinging directly on the rear of
the pellet which has been pre-positioned in the barrel’s breech. The pellet is
thus driven up the barrel by the air charge.
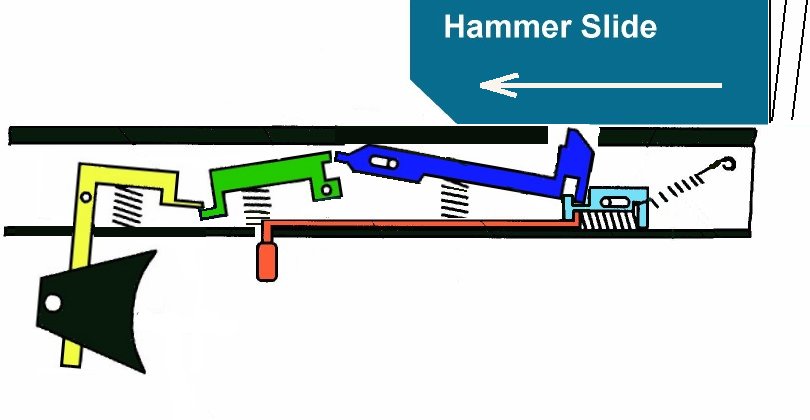
Once the energy from the Hammer
Slide’s impact has been dissipated, the Air Bottle Release Valve, acting under
the influence of the high-pressure air in the bottle and a small internal return
spring, returns rapidly to its sealed position shutting off the air supply. This cycle is
repeated for each shot.
Tips and Tweaks
Even with such a simple mechanism, there
are factors which can effect the firing cycle of the rifle and cause erratic
accuracy and power.
It should be understood at this point
that accuracy and power in the rifle are very closely related, especially with the
heavier ammunition this weapon prefers. The pellet relies entirely on the blast of
high-pressure air generated during the ‘valve open’ phase of firing to not
only expel the pellet from the barrel but do so at a known and consistent
velocity. Any alteration in the pressure generated will effect not only the
trajectory of the pellet but also its stability due to the spin imparted to the
pellet by the
barrel’s internal rifling. This will affect the Point of Impact (POI) of the
pellet.
There are several crucial factors that can affect the delivery of air into the breech of the gun and, for the sake of brevity, they are simply listed below.
-
Unlubricated hammer slide bearing surfaces
-
Unlubricated breech seal surfaces and ‘O’ rings
-
Worn Breech Seal ‘O’ ring seals
-
Weak Hammer Spring
-
Dirty or Damaged Air Bottle Valve Stem
-
Loose Air Bottle Valve Stem
-
Incorrect Air Bottle Pressure (Too low or too high)
It has been demonstrated
in tests that a dry
hammer slide can ‘chatter’ as it travels rearwards during the firing cycle.
This chatter will dissipate a surprising amount of the hammer’s energy, all
which is ideally required for opening the air valve. A dry slide will travel
rearwards more slowly, thus the valve receives an insufficient impact to fully
open and a ‘short charge’ results. This is often heard as a muffled report
from the gun and a shot which passes wide of the target.
Unlubricated breech seal surfaces and
‘O’ rings will also absorb Hammer Impact Energy and can also allow air
leakage at the ‘O’ rings. It is highly advisable to regularly and sparingly grease
the assembly with a silicone-based lubricant to both prolong ‘O’ ring life
and maximise efficiency by reducing wear.
The hammer spring is, in the opinion of
the author, rather weak for the task it is required to do. Basically, its job is
to knock the air valve fully open as quickly as possible after trigger release
and it often fails to do this for the above-mentioned reasons. Increasing the
preload on the spring has been shown to have a dramatic effect on the
consistency of the valving system and is easily achieved by packing the spring
it its foremost end where it abuts the rear Barrel Mounting Ring. Steel or Brass
washers of a suitable internal and external diameter are the most suitable items
for use as shims and usually packing to a depth of approximately .5” is
sufficient to achieve a marked improvement. This will normally increase the
muzzle velocity of the weapon and care should be taken in readjusting the gun
back down to legal energy limits if applicable by means of the Top Hat.
Note: On American guns there is a ‘Power Adjuster’ which simply preloads the hammer spring by means of a movable spring packing device on a thread.
A slightly more complex improvement is to
have an exact copy of the hammer made up in a heavier material, brass being the
obvious choice because of its weight and corrosion resistance. Many users have
reported excellent results using replacement aluminium hammers. A heavier hammer
will suffer less from countering forces and, with its greater mass, will more
effectively deliver energy from a correctly tensioned spring to the valve during
impact. It will also cause the valve to remain open for fractionally longer
increasing power delivery.
The Air Bottle Release Valve
The Air Bottle Release Valve neck is
threaded to accept a small ‘Top Hat’ adapter which engages with the Breech
Slide ‘O’ ring seals to form an airtight join during firing. The Top Hat
assembly may be screwed in and out on its stem and, by so doing, affect the
amount by which the valve is struck open during hammer impact. The further out
the Top Hat is screwed the further the valve may be struck open and vice versa. Screwing in
the Top Hat will reduce the rifle’s Muzzle Energy while screwing it out will
increase it. In order to prevent the adjustment being lost during the rigours of
hammer impact, a small recessed securing screw is set into the outer collar of
the Top Hat and tightened by means of an Allen Key (Hexagon Wrench). The default
setting from which to start calibrating for the UK's 12ft/lb power limit is approximately 1.5 turns out from the
fully screwed-in position.
One of the most common causes of erratic firing with
this rifle is a loosening of the Top Hat itself. Once the Top Hat has loosened,
the valve is no longer presented to the Breech Slide in identical manner every
time leading to variations in hammer strike. Additionally, the loose Top Hat
will tend to dissipate hammer energy unpredictably. The grub screw used for securing
purposes is rather inadequate for the job and, after setting-up the gun in
conjunction with the other adjustments described here, the application of a
small quantity of thread sealing compound is highly beneficial. For higher
powered rifles with heavier hammers and uprated springs I have successfully used
Araldite Epoxy Adhesive to permanently lock the Top hat once set. This is
achieved by setting-up the Top hat to its optimal position and then measuring
the distance between the base of the Top Hat and the valve body with feeler
gauges. The Top Hat is then removed, a light film of epoxy applied to the
valve stem threads and the Top hat refitted to its previous position and the
adhesive allowed to cure. The difference this simple precedure makes in terms of consistency and
reliability has to be experienced to be fully appreciated. Moderate heat will soften the epoxy sufficiently to allow removal if needed.
The Barrel
The
removable barrel plays a crucial part in the
delivery of the chosen projectile and a worn, bent or damaged barrel will produce at
best, indifferent results. Sharp, hard and abrasive objects should never be
introduced into a Stealth barrel as this could damage the rifling and adversely
affect projectile control.
Early guns had a proprietary barrel,
which gave less than ideal results. However, later Stealth’s (Stealth 2000 and
later) have a Walther match grade barrel which produces excellent accuracy, especially in conjunction with the optional bipod.
The single most common problem with the
Stealth barrel is mounting. I’ve found loose barrels, barrels mounted at an
angle due to foreign objects jammed inside the gun body and even barrel support rings
missing or damaged. Put simply, a clean, solidly (and accurately) mounted and
firmly secured barrel in good condition WILL deliver accurately. A nice touch
which may (marginally) improve accuracy is to get the plastic barrel mounts
remade in brass or steel at your local machine shop.
WARNING! WARNING! WARNING! WARNING!
There have been threads on various
BBS’s, which have recommended drilling out the valve stem for more power. DON’T
DO IT UNLESS YOU’RE TUNING FOR SERIOUSLY HIGH POWER AND HAVE A FIREARMS
CERTIFICATE (FAC)! Firstly it’s
irrevocable, Secondly it can weaken the valve stem if overdone and Thirdly
it’s not necessary for a UK 12 foot pound rifle. Finally, unless you possess a
FAC, carrying out dramatic alterations to your Stealth can turn it into an
illegal firearm with no easy way of returning it to a legal condition. The
penalties for this are extremely severe with huge fines and prison sentences,
even for first offences. Remember too that, if you do take your Stealth up to
FAC power levels you MUST get it included on your FAC by a Registered Firearms
Dealer. In my expereience they will charge in the region of £20 or so for
completing the paperwork for you.